Creating Media for LED Signs
Regardless of the software you use to control your LED sign, below are some tips on creating and using media files such as still images and video clips to get the most out of your sign investment.
Creating Media Files
- Using your photo-editing or video editing software, create a new file with a canvas that is the same pixel size as your display. For example, if your display is 32x128, create a file that is 32 pixels high by 128 pixels wide. If you are given an option for a color mode, choose 24-bit RGB. We recommend using black as the background color.
- If using any images or video clips saved on your computer, import them onto the canvas using your software's Import function. See Optimizing Media below for tips on how to best resize and crop these items.
- If adding text, use the Text tool in your editing software to place it into the canvas. The larger you make the text, the more readable it will be. Text that is smaller than 10 or 12 pixels in height is usually unreadable.
- For signs that only show one color such as red, we recommend converting the media to grayscale (black and white). This is usually done through your editing software's color settings. While this step isn't required, it will allow you to see and adjust the contrast of the file if necessary.
- Once the image or video clip is to your liking, save the file on your computer in your software's native file format. For example, a Photoshop file should be saved as a .psd. This will allow you to change the file in the future.
- Finally, export your media using the following recommended settings. The pixel dimensions of the resulting file should be the same size as your display.
Recommended Settings
SignCommand.com Still Image
File format: PNG or JPG
SignCommand.com Video Clip
File format: MP4
Frames per second: 30
Compression: H.264
DayStar Media Still Image
File format: BMP
DayStar Media Video Clip
File format: AVI
Frames per second: 30
Compression: None
Optimizing Media
LED signs are amazing pieces of technology. They are capable of showing text, images, animations and video visible from far away and under harsh outdoor conditions. Despite this, all LEDs have limits when it comes to the amount of detail they can display.
The reason for this limitation has to do with the number of pixels, or points of light, that make up the display. Each pixel is controlled as either on or off - and in some LED signs, each pixel can produce different levels of light output. The difference in light output is what creates a three dimensional image on the display itself. Text messages transmitted directly onto a sign are typically using pixels that are either on or off to make up each character in the message itself.
Pixels are arranged in rows that go across the length of the display, and columns that go up/down the height of the display. This forms the pixel matrix, typically written as height by width. For example, a 32x128 pixel display is 32 pixels high and 128 pixels wide, for a total of 4096 pixels.
Commonly, only display height in pixels is used for comparison purposes. This is because the height is typically smaller than the width, and is therefore more of a deciding factor for display capabilities. LEDs are typically presented longer rather than taller so that the user has the option to include text messages from left to right on the display.
A typical LED display may be between 32 and 96 pixels in height. In comparison, high definition TV is 1080 pixels high and a 5 mega-pixel image is 1920 pixels high.
Clearly, this amount of detail cannot be replicated on an LED display. So how does someone take their own image or video and make it look good on their sign? The answer is to find an optimal way to change its size to fit the display. When it comes to placing an image or video onto an LED display, there are three ways to make it fit:
- Resizing (shrinking the image or video to fit on the display)
- Cropping (selecting only a portion of the image or video to be displayed)
- A combination of the two
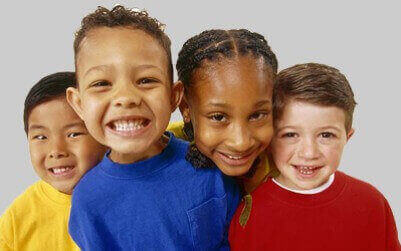
We will be using this example image that is currently 250 pixels high by 400 pixels wide. It is in color, but the following instructions also apply to red or amber displays. They also apply equally to video as well as images.
Resizing
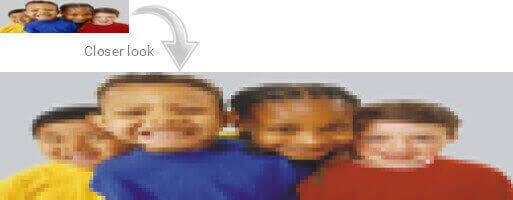
The least desirable way to put an image or video on your display is to simply resize it. In essence, you are combining many pixels into one, resulting in a loss of detail. The larger the original image, the more pixels that need to be combined to fit onto the available LED matrix. Here we see our example image (which is 250 pixels high by 400 pixels wide) resized for a 32x128 display matrix.
You will notice two differences from the original image. The first is that the image is now pixilated, meaning that the individual pixels that make up the image are now visible. Pixilation is unavoidable on an LED display due to the limited number of pixels available. However the gradation, or difference in color between adjacent pixels, plays a large part in making the image look good. We will see this in the next example.
The second difference is that the aspect ratio of the image has changed, making the image look "stretched". This is because the height had to be reduced almost twice as much as the width to make the original image fit into 32 by 128 pixels.
Cropping
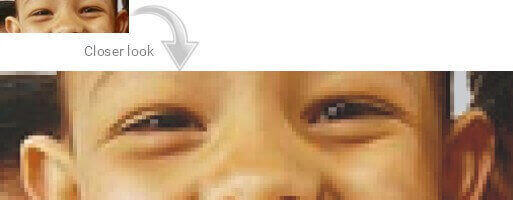
A more acceptable way of fitting an image to a display is to crop it. This simply means selecting a 32x128 pixel area in our original image and removing the rest. Here we see our example image cropped to 32x128.
The negative to this approach is that only a very small area of the original image could be used. However, you will notice that the image still maintains its original aspect ratio (it doesn't look "stretched" or "scrunched"), and that the smooth gradation makes the image look much better. Try viewing the large examples at a distance to see the difference.
Resizing and Cropping
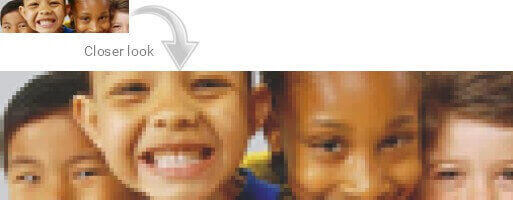
The best approach is to find a middle ground that gives us some of the benefits of both. This is done by resizing the image first (to something larger than the display and without changing the original aspect ratio) and then cropping, or by performing both simultaneously. Here we see our example image that has been both resized and cropped.
Here we have resized the image to include more of the subject, but have also cropped to reduce the amount of detail. The result is an image that will look good on the display.
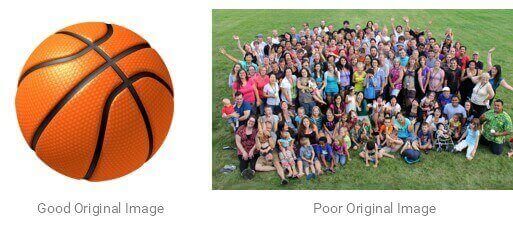
Choosing the Right Image or Video
While these tips can be used for any image or video, starting with the right one can make things much easier. Choose subjects that do not contain a lot of detail and have a smooth gradation of shades or color.
Images or video that start with a high amount of detail will have many adjacent pixels combined into one, resulting in a loss of clarity of the original subject.
Want Professional Content Creation?
Custom graphics and animations are available through Outdoor Signs America.
Our talented artists will create media to fit your sign.